You need to know 4 things before roughing-in a toilet:
- The distance to set the toilet flange from the back wall.
- The necessary clearance from left to right.
- How much space to leave in front of the bowl.
- Where to put the cold water supply line.
And it’s pretty important to get these measurements right…
Just imagine the look on your wife’s face (or husband) after you accidentally set the toilet too close to the wall…SCARY.
So to keep you out of the doghouse…I’ll break down everything you need to know right inside this article.
So let’s start with:
#1. The Distance To Set The Toilet Flange From The Back Wall.
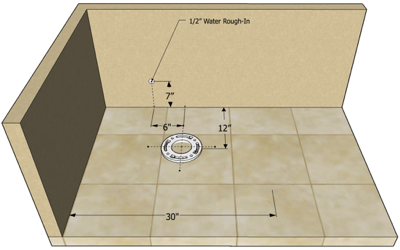
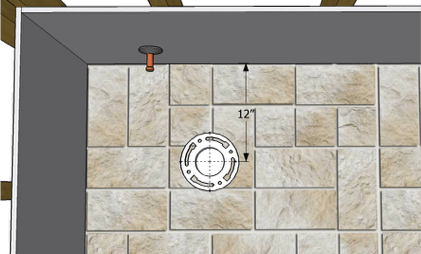
You’ll want to set the center of the water closet flange 12inches from the finished back wall. Don’t measure from the base molding!
Take this measurement from the finished wall.
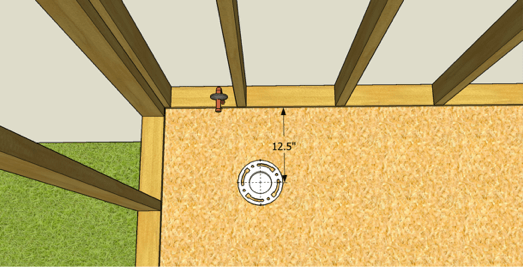
Now, if you’re measuring from stud walls, add in the thickness of your wall.
Most people install 1/2″ drywall. And if that’s the case, this measurement needs to be 12 1/2″ (measured from a stud wall).
It’s important to know that this measurement is for standard toilets with a 12″ rough-in.
And some people may be wondering…
“What does 12-inch rough-in mean for a toilet?”
That means there is 12-inches between the center of the toilet flange to the finished back wall.
This information can be found on the toilet’s specification sheet.
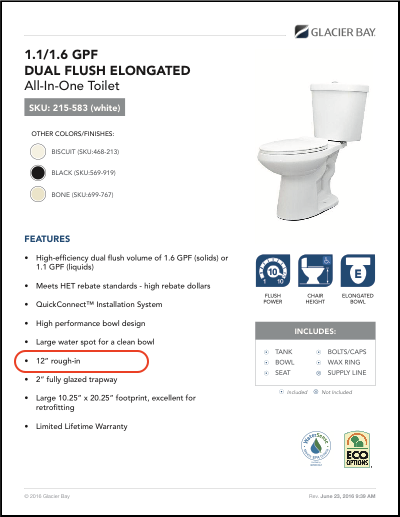
12 inches is the most common toilet rough-in size.
However, it’s useful to know that toilet’s also come in:
- 10-inch rough-in.
- 14-inch rough-in.
“Why is it helpful to know water closets have different rough-in sizes?”
If you’re simply replacing your toilet, and notice the center of your flange is only 10 inches from the wall, there’s no need to go through the hassle of moving the flange.
Just get a water closet with a 10″ rough-in.
Or suppose you’re roughing in a toilet and there’s a floor joist in your way. You may be able to use a different toilet rough-in to dodge the framing.
Knowing these things can save you time and money.
Also, if you need help figuring out how to vent a toilet, check out our other article here. Or if you’d like to see how an entire bathroom is plumbed, check out this article.
Moving along…
The next measurement you need to know is:
#2: The Clearance From the Center of the Toilet To Any Adjacent Fixture or Sidewall.
This measurement is 15 inches. That’s the minimum (you can have more).
So looking at the toilet, make sure there are at least 15 inches of clearance from the center of the toilet to any adjacent fixture (or wall).
To the left…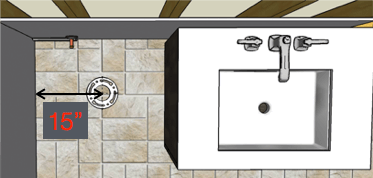
And the right…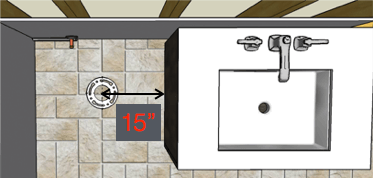
For example:
- If a bath vanity is next to your toilet, you’ll need 15″ of clearance.
- If a tub is next to your toilet, you’ll need 15″ of clearance.
- If a wall is next to your toilet, you’ll need 15″ of clearance.
Keep in mind, if you’re measuring next to a stud wall, again, add in the thickness of your wall.
For example, suppose you’re installing 1/2″ drywall with 3/8″ mosaic tile.
Add it all up…
| Item | Thickness |
|---|---|
| Drywall | 1/2" |
| Mosaic Tile | 3/8" |
| Mortar | 1/8" |
| Total Thickness | 1" |
Then take the total wall thickness (1 inch) and add it to the 15″ minimum.
So in this example, the center of the flange would be 16 inches measured from the stud sidewall.
The third measurement you need to know is…
#3: The Distance From the Front of the Toilet To Any Obstruction.
Now, this clearance depends on your local plumbing code.
If your local jurisdiction is under the IPC (International Plumbing Code), you’ll need at least 21 inches of clearance.
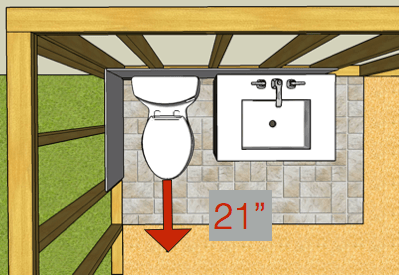
If your plumbing code is under the UPC (Uniform Plumbing Code), you’ll need 24 inches of clearance.
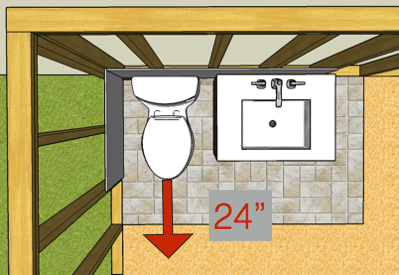
This is measured from the front edge of the toilet to any obstruction including:
- Walls
- Another Plumbing Fixture
- A Door
So maybe you’re wondering:
“Do I still need 21″ of clearance in front of the toilet when the bathroom door is open?”
The answer is no. The purpose of this clearance is to allow enough space for a person to use the toilet comfortably.
Luckily, people shut the door when using a toilet.
And as long as you have 21″ (or 24″) of clearance when the door is shut you’re good to go (literally).
The final measurement is…
#4: Where To Put The Cold Water Supply Line.
From the center of the water closet flange, measure 6″ to the left, then come up 7″ above the finished floor.
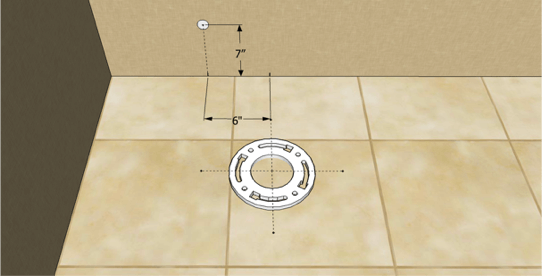
This is a nice height because it clears most sizes of base molding.
A lot of times the water line comes in too low and requires notching the trim.
Needless to say, this usually turns out UGLY.
7 inches above the finished floor allows enough clearance for an escutcheon, and base trim all the way up to 5.25″.
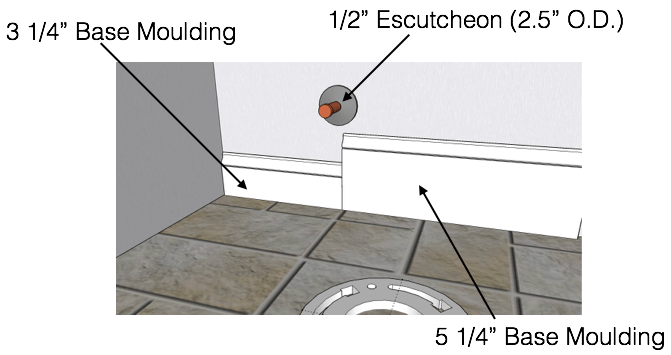
A lot of plumbers go 6″ above the finished floor. And that’s okay…most of the time.
However, if 5 1/4″ base molding is installed, you’ll have to cut the trim.
So there you have it…you now know more about toilet rough-in than 99% of the human population.
To help you remember all these dimensions, we’ve put together a 1-page print out.
Just put your email below and we will email it to you now…