In this article, you’re going to learn how to plumb a bathroom.
I’m talking drains and vents, the stuff bathrooms are really made of.
The best part?
We loaded this article with bathroom plumbing diagrams, illustrations,
and even a material list…
to supercharge your understanding of this basic DWV system.
You can jump to specific sections of this article, by using the Table of Contents below.
Article Table of Contents:
1. The DWV Fittings Used To Plumb This Bathroom (based on code)
2. Bathroom Plumbing Rough-In Dimensions
3. How To Plumb a Bathroom Sink
4. The Only Fitting Code Allows for Vertical to Horizontal Transitions
5. How To Rough-In the Toilet Drain
6. How To Easily Create a Cleanout (it’s just two fittings)
7. Bathroom Plumbing Vents (and why they’re important)
8. Do Plumbing Vents Need Sloped?
9. Requirements For Plumbing Vents in Cold Climates
A list of DWV Fittings used to plumb this bathroom.
Keep in mind, the exact fittings you’ll need depend on your local plumbing code.
The two major plumbing codes in the United States is the IPC (International Plumbing Code) and the UPC (Uniform Plumbing Code).
The table below lists each DWV fitting used to plumb this simple bathroom. Notice each plumbing code has its own column with the specific quantity of needed fittings.
| DWV Fitting | Qty in IPC | Qty in UPC | |
|---|---|---|---|
| 1.5" Sanitary Tee | 2 | 1 | |
| 2"x2"x1.5" Sanitary Tee | 0 | 1 | |
| 3" Sanitary Tee | 1 | 1 | |
| 1.5" 90 | 1 | 1 | |
| 4"x3" Closet Bend | 1 | 1 | |
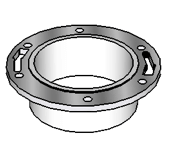 | 4" Closet Flange | 1 | 1 |
 | 3"x3"x1.5" Wye (w/ 45) | 1 | 1 |
 | 3" Combo | 1 | 1 |
 | 1.5" P-Trap | 1 | 1 |
| 1.5" Trap Adapter | 1 | 1 | |
| 3" Cleanout Adapter | 1 | 1 | |
| 3" Cleanout Plug | 1 | 1 | |
| 3"x1.5" Flush Bushing | 1 | 0 | |
| 3"x2" Flush Bushing | 0 | 1 |
Here’s an easy to print version of this table.
We will use these fittings to plumb this bathroom in just a moment.
The bathroom plumbing rough-in dimensions you need to know.
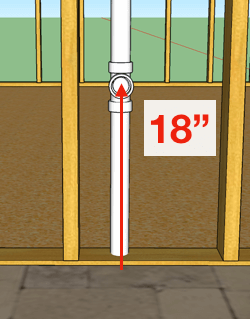
The bathroom sink rough-in dimensions are as follows:
The center of the lav’s drain is located 18” (approximately) above the finished floor.
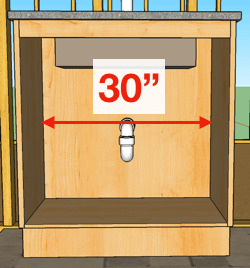
Also notice the drain is centered right in the middle of this 30 inch vanity.
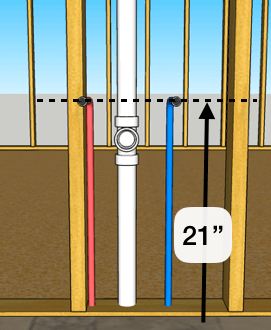
The bathroom sink’s water lines are roughed-in 3 inches above the drain. Measure 21 inches (approximately) above the finished floor.
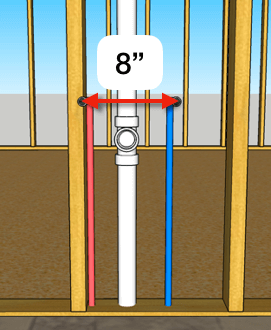
The hot line and cold line are spaced 8 inches apart (from left to right). From the center of the drain, measure 4 inches to the left and 4 inches to the right.
Moving over to the toilet.
The center of the closet flange is 12 inches from the finished rear wall.
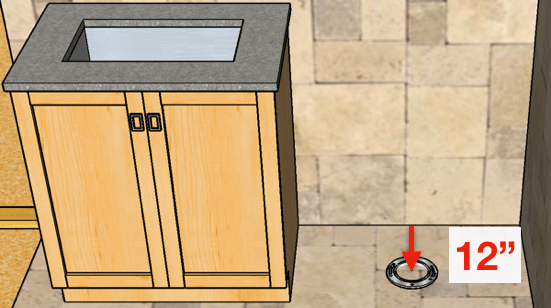
If you’re measuring from an unfinished wall, don’t forget to add the wall thickness to this 12 inches.
We also have 32 inches of total clearance between the finished side wall and the bathroom vanity. The toilet flange is centered right in the middle.
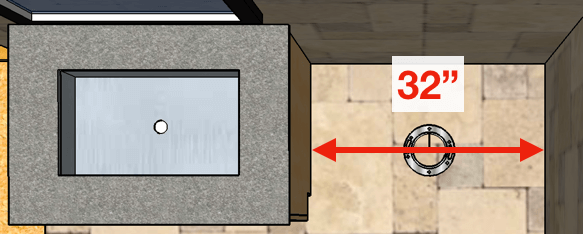
Keep in mind, 30 inches is the minimum distance code allows (you can have more).
For additional details about roughing in a closet flange checkout this article…or download this “Plumbing Diagram” for an easy to understand picture.
All these dimensions and fittings might not make sense right now.
But don’t worry, the fun is about to begin as you learn…How to transform these DWV fittings into a functional, code approved bathroom.
How to plumb a bathroom sink.
This bathroom lav is roughed-in with a 1.5” sanitary in the vertical position (please don’t use a wye here).
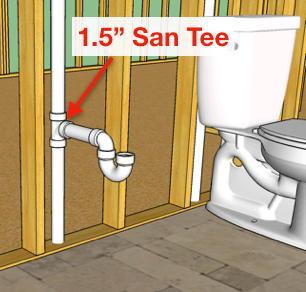
This makes our bathroom sink drain 1.5”, the vent 1.5”, the trap arm 1.5”, and the p-trap 1.5”.
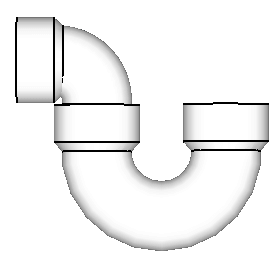
Here’s how to connect the plumbing under your bathroom sink.
You will need a 1.5″ trap adapter and a 1.5″ plastic tubing p-trap (sometimes called trim trap).
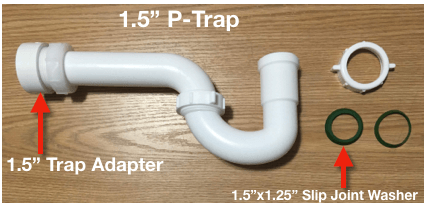
Trim Trap kits come with two different sizes of washers. You’ll use the 1.5″ x 1.25″ slip joint washer to connect the P-Trap to the lav’s 1.25″ waste outlet.
See the bathroom sink plumbing diagram below…

Keep in mind, this is a P-Trap and not an S-Trap. If you’re dealing with an s-trap, read our S-Trap article here
Both major plumbing codes in the U.S. permit a single basin lav to be roughed in with a 1.25” vent and a 1.25” trap. See IPC Table 709.1 or UPC Table 702.1.
However, in this example, I’m going all 1.5 inches.
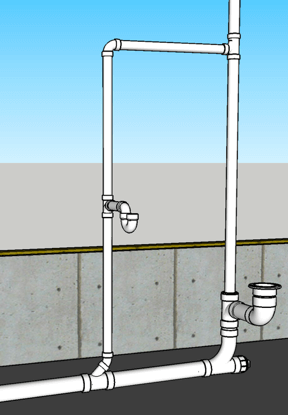
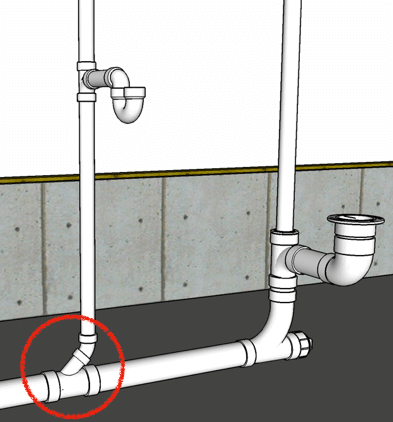
Let’s follow this bath lav’s drain downstream. You’ll see the vertical to horizontal transition pictured below.
Remember this important plumbing tip when it comes to drainage (not venting):
“When waste transitions from a vertical pipe to a horizontal pipe…
always use long pattern DWV fittings.”
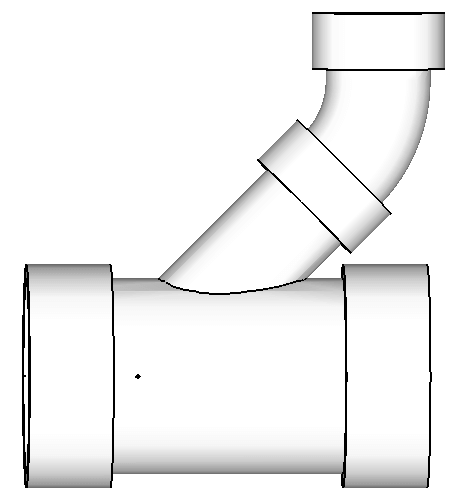
In the above example, there are two acceptable fittings to choose from:
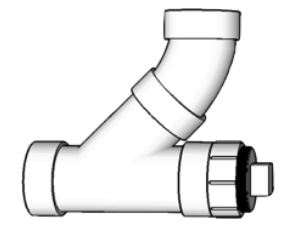
Wye with 45

…or a Combination Wye and 1/8 Bend (Combo Fitting)
We’re using a 3”x3”x1.5” wye with a 1.5” street 45.
Let’s move upstream to talk about the toilet drain.
I’m using a 4-inch closet flange. It’s connected to a 4”x3” closet bend. The closet bend fitting is 4 inches on the inlet and 3 inches on the outlet.
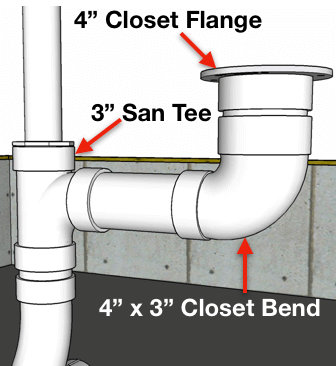
Then, the outlet of the closet bend connects into a 3-inch sanitary tee via a short piece of 3 inch PVC.
As we follow the toilet’s drain downstream of the san tee, notice another vertical to horizontal transition.
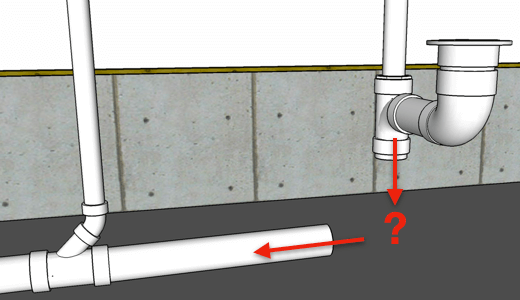
Remember that plumbing tip? If so, you’ll be able to answer this question:
What types of DWV fittings does the code permit for vertical to horizontal transition?
A.) Long Sweep Fittings
B.) Short Sweep Fittings
The answer is A.
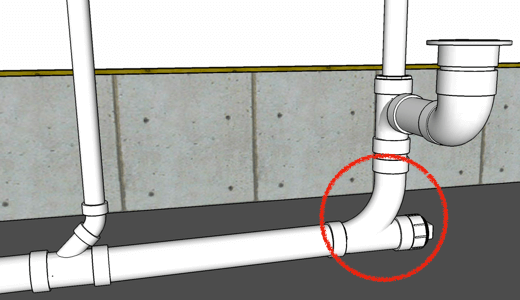
And that’s why I’m plumbing this transition with a 3” combo (aka combination wye and ⅛ bend).
Also, notice the cleanout plug in the diagram above.
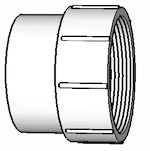
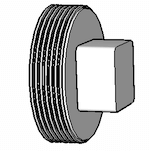
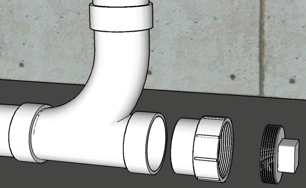
To add a plumbing cleanout, you’ll need two additional fittings:
A 3” cleanout adapter…
And a 3” cleanout plug…
The cleanout adapter glues right into the inlet of the combo. And provides a convenient point of access to rod the drain in case of a backup.
By the way, other types of DWV fittings work for vertical to horizontal transitions.
For example,
Wye with 45
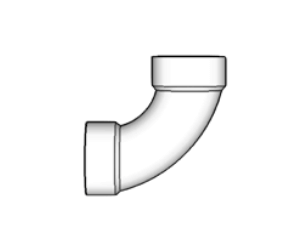
Long Turn 90
Two 45’s

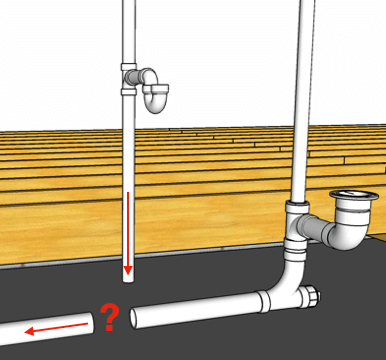
Let’s move downstream into this drainage system.
In the plumbing diagram below, notice how the bathroom’s 3-inch drain wye’s right into the building drain.

That’s just a 3-inch wye (with 45). You could also use a 3-inch combo for this connection.
Now that you have a good handle on this bathroom’s drainage system,
Let’s switch gears and talk about…
Bathroom Plumbing Venting and why it’s important.
Every plumbing fixture needs to be vented.
The main purpose of a plumbing vent is to protect trap seals. The trap seal (inside the P-Trap) is what prevents sewer gas from escaping into your home.
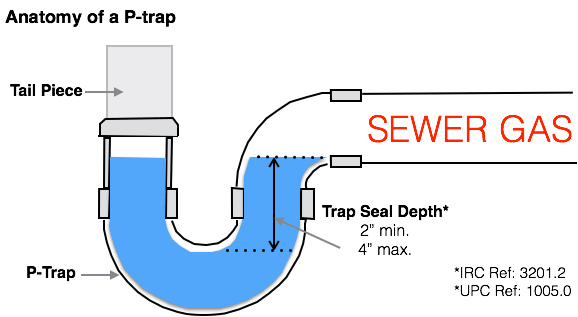
Waste flowing through a drainage system creates air pressure fluctuations. These fluctuations in pressure can disrupt trap seals. If these fluctuations are large enough, they remove part or even all of the trap seal. And once that precious seal is lost….in comes the sewer gas….right into your home.
A properly installed vent keeps these pressure fluctuations under control…which in turn keeps the trap seal inside the P-Trap.
There are several different methods of venting: wet venting, common venting, circuit venting, island fixture venting, etc…
One of the simplest and most widely used methods of venting is called “conventional venting.” That’s when each plumbing fixture has its own vent, which is called an individual vent. And that’s the method of venting we’re using to plumb this bathroom.
By the way, to learn more about plumbing vents read this article on venting.
Let’s start with…
Sizing individual plumbing vents.
The minimum toilet vent size depends on your plumbing code. In the IPC toilet vents are 1.5”, in the UPC it’s 2 inches. For more on venting a toilet read this article.
To connect the appropriate size vent into the hub of the 3” sanitary tee, you’ll need a flush bushing. Flush bushings kind of look like hockey pucks.
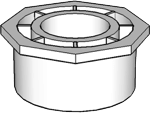
In the IPC, use a 3”x1.5” flush bushing, in the UPC use a 3”x2” flush bushing (See diagram below).
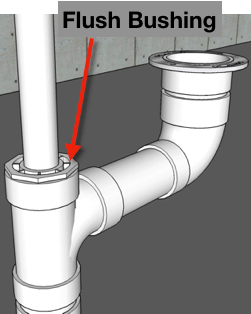
You could also use a reducer (looks like a funnel) to make this connection.

Let’s sidestep over to the bath lav’s individual plumbing vent.
You already know the lav’s individual vent is sized at 1.5 inches (1.25” code minimum).
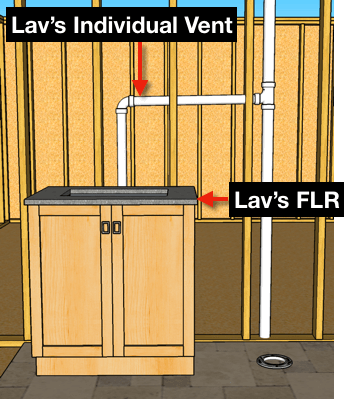
But notice the vent offsets horizontal well above the lav’s flood level rim (FLR)…and that’s very important.
Here’s a popular plumbing question…
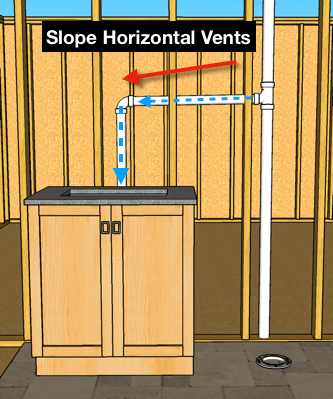
Do Horizontal Plumbing Vents Need To Be Sloped?
And the answer is yes.
Notice in the picture below how the horizontal portion of the plumbing vent has a slight grade to it.
Water vapor can condense inside vent pipes. Rainwater also enters portions of the venting system. And that’s why horizontal vents should have a little slope on them. This slope drains any water vapor back into the drainage system (thanks to gravity).
Now I will mention something to my friends in the UPC. Unlike the IPC, the UPC will let you “sneak by” with a horizontal level vent (without any grade on it). This assumes it’s above the FLR (of course). But keep in mind, horizontal vents cannot have sags or any drops (UPC 905.1). And again that’s UPC only, the IPC wants horizontal plumbing vents sloped.
Also, notice the bathroom sink’s individual vent tee’s right into the toilet’s individual vent. That’s done with the appropriate sized sanitary tee that’s upside down.
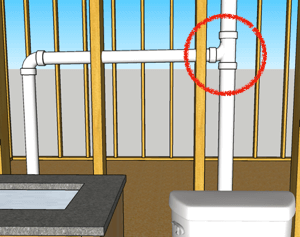
In the IPC use a 1.5” sanitary tee (upside down), or in the UPC use a 2”x2”x1.5 san tee (upside down) to make this connection.
Then, this vent can terminate through the roof all on its own. Or in many cases, it can tee into the home’s existing venting system.
Another important thing about plumbing vents…
In cold weather climates, plumbing vents need to be increased in size before extending out through the roof.
This increase prevents the vent from closing due to frost (IPC 903.2)(UPC 906.7). Check your local code for the appropriate size but usually, it’s 3 inches. This increase should also be made within the building’s thermal envelope. Or in other words, within the heated portion of your home. Again check your local code.

So that wraps us this article.
And maybe your wondering:
“How do I plumb a full bathroom?”
“What about a bathtub? Or a shower?”
“How do I plumb bathrooms with different fixture layouts?”
If that’s you, I’ve got good news.
We just put together an ebook that makes plumbing any bathroom dramatically easier.
It’s called The Bathroom Blueprint.
It’s our new digital e-book that contains plumbing diagrams for 17 different bathrooms!
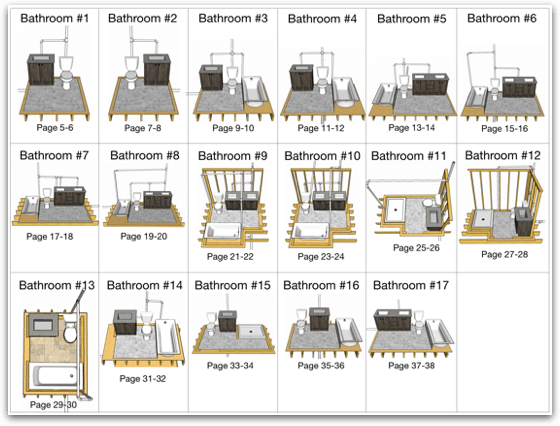
These diagrams will VISUALLY show you how a bathroom DWV system fits together.
We also are throwing in access to our private membership website.
Inside the member area, you get private access to plumbing tutorial videos never released to the public before.